

Have you ever had a co-worker who, in spite of the fact that the job was maddening and ridiculous, made it almost okay to go in to work every day? That's my friend Liz. She and I sat side-by-side on the front lines (read: the lobby) of classified advertising in our local (albeit corporately-owned) newspaper. We were together through real estate ads ("Why do I need to put in the location?" "So that people know where the house is?"), employment ads, and...my own favorite...yard sale advertising ("I thought that the ad was only $15!" "Yes, ma'am...for three lines. You just listed everything in your garage and took up 50." "But it's says $15!").
Liz is kind, and patient, and reminded me what a satisfying term "fathead" can be. She is given to arm-waving and desk-slapping and head-on-desking, and really, in the world of classified advertising, you need to have all of that.
She is also a good friend. And these are her birthday cupcakes.
This may be one of the most high-maintenance cupcakes I've posted. I feel as though I always say this...none of the components are difficult, but you do need to pay attention. And if you are going to make a French buttercream, you have to have a candy thermometer. I also will warn you that the filling does contain uncooked eggs, so if you have a compromised immune system, you may want to use pasteurized eggs, or a different filling altogether. Since I live in a magical house, I can consume uncooked eggs, cake and cookie batter, and pink pork with abandon...and I do. Just take the time to read the recipe through, look at the pictures (that's why I put them there!) and go one step at a time. It will be worth it, I promise.
These cupcakes are complicated, over-the-top, and very, very good. Just like Liz. Happy birthday, my dear friend.
Are you ready? Let's begin with...
~Chocolate-Salted Caramel Cupcakes~
(adapted from Brown-Eyed Baker)
½ cup cocoa powder
½ cup hot water
2¼ cups all-purpose flour
¾ teaspoon baking soda
¾ teaspoon baking powder
½ teaspoon salt
1 cup plus 1 tablespoon unsalted butter, at room temperature
1 3/4 cups granulated sugar
3 eggs
1 tablespoon vanilla extract
¾ cup sour cream
Preheat oven to 350 degrees. Line 22 standard-size muffin pans with paper liners (you could probably get 24 out of this too if you distribute the batter absolutely evenly. I don't think I'm capable of that).
In a small bowl, whisk together the cocoa powder and hot water until smooth. In a separate medium bowl, whisk together the flour, baking soda, baking powder, and salt. Set aside for now.
 |
| Make sure all of your ingredients are ready to go. |
Combine the butter and sugar in a medium saucepan set over medium heat. Cook, stirring occasionally, until the mixture is smooth, and the butter is completely melted. Transfer the mixture to the bowl of your stand mixer and beat on medium-low speed until the mixture is cool, about 4 to 5 minutes.
Add the eggs one at a time, mixing well after each addition, and scrape down the sides of the bowl with each addition. Add the vanilla and then the cocoa mixture, and continue to beat until smooth.
Reduce the mixer speed to low, and add the flour mixture in three additions, alternating with the sour cream, beginning and ending with the flour mixture. Mix each addition until just incorporated. Do not overmix!
Divide the batter evenly between the prepared liners, filling each about two-thirds full. Bake until a toothpick inserted in the center of the cupcake comes out clean, about 20 minutes. Go ahead and rotate the pans at the 10-minute mark. Let the cupcakes cool in the pan for 10 minutes, then transfer to a wire rack to cool completely.
Divide the batter evenly between the prepared liners, filling each about two-thirds full. Bake until a toothpick inserted in the center of the cupcake comes out clean, about 20 minutes. Go ahead and rotate the pans at the 10-minute mark. Let the cupcakes cool in the pan for 10 minutes, then transfer to a wire rack to cool completely.

 |
| Ta-da! This was the easy part. |
(Adapted from David Lebovitz's recipe)
(and if you don't know who David Lebovitz is and you like desserts, you really ought to look him up. He is one of my culinary heroes.)
1/2 cup granulated sugar
3 tablespoons salted butter, cubed
3/4 cup heavy cream
6 ounces bittersweet chocolate, chopped
4 large eggs, separated (if you're looking carefully at the photo you'll see I used 5, because my eggs were more on the medium side)
1 teaspoon kosher salt
 |
| Mise en place! In other words, get your stuff together! I can't emphasize enough how much easier this process will be if you just take this step. Why yes, that is a battery-operated Star Wars light-saber pepper grinder in the background. We also have the matching salt grinder. And stick blender, but I digress... |
Spread the sugar evenly over the bottom of a wide saucepan. Heat the sugar over medium heat. As it begins to liquefy at the edges, use a heatproof spatula to very gently drag the melted sugar toward the center. Watch carefully, so as not to burn the sugar.
Continue to cook, stirring very gently, until all the sugar is melted and begins to caramelize. When the caramel is a deep amber color and starts to smoke, wait for a moment for it to smell just slightly burnt, then remove it from the heat and quickly whisk in the butter, stirring until melted.
Gradually whisk in the cream and stir until the little bits of caramel are completely melted (any that absolutely will not melt can just be strained out, so no worries).
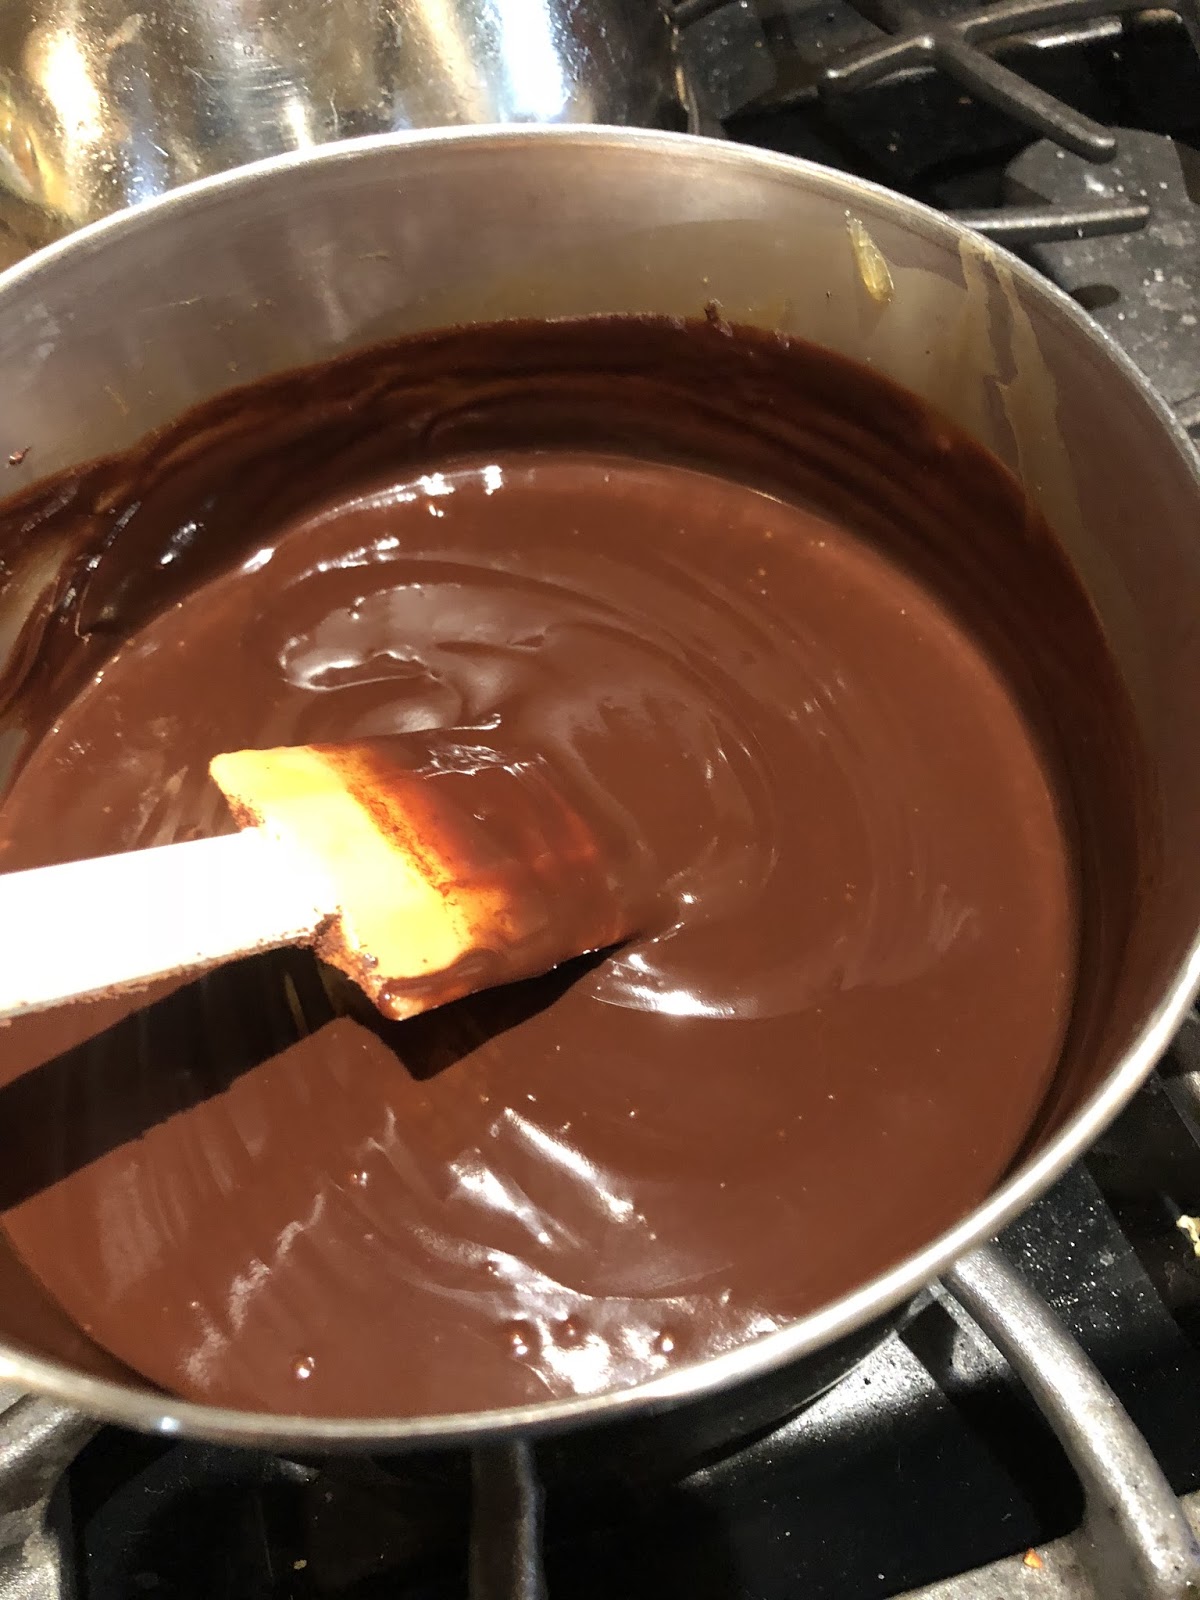
Once the mixture is smooth, add the chocolate, stirring gently until it has fully incorporated into the caramel. Scrape the mixture into a large bowl and let it cool to room temperature. Once it's no longer warm, whisk in the egg yolks. Set that aside for now.
In a separate bowl, whip the egg whites until stiff. Fold 1/3 of the whipped whites into the chocolate mixture, and sprinkle in the salt. Fold in the remaining beaten egg whites just until no streaks of white remain.
 |
| Just keep moving the melting sugar around, gently. |
 |
| Getting there... |
 |
| Okay, all melted in. Use your senses... |
 |
| Stand back! |
 |
| This is what you want to see once the cream has been mixed in. |
 |
| Add in the chopped chocolate... |
 |
| Chocolate is nicely melted in... |
 |
| Mixture with egg yolks |
 |
| Whipped egg whites. You're supposed to be able to invert the bowl over your head and the egg whites stay put if they are properly whipped. I did do that, reluctantly, but I'm not sharing a photo. Upend the whites over your own head. |
 |
| Just keep folding, gently. |
 |
| And here you have your mousse. |
To fill the cupcakes, cut out a cone shaped portion out of the top of each cupcake. Cut off the extra cake until just the flat top remains (just like a little hat). Put about a tablespoon (use your common sense and put in enough of the mousse until the cupcake is almost full. Remember that you have to put the hat back on the cupcake). Replace the top onto each cupcake and put the cupcakes in the refrigerator to let the mousse set up.


 |
| I always look at these scraps and think, "I really ought to use these to make cake pops." Then I remember that I don't really care for cake pops. |

You are going to have extra mousse. That's great! Spoon your leftover mousse into serving dishes and put in the fridge to set up alongside the cupcakes. That way, when someone asks you later what's for dinner, you can say, "Leftovers (because you've been working on these dang cupcakes all day)...and chocolate-caramel mousse!"
 |
| Second dessert! |
~Espresso French Buttercream~
1 1/2 tablespoons instant espresso powder
2 tablespoons hot water
1 cup granulated sugar
6 tablespoons water
10 large egg yolks
2 cups unsalted butter, cubed, and brought to room temperature
1 teaspoon vanilla extract
2 tablespoons hot water
1 cup granulated sugar
6 tablespoons water
10 large egg yolks
2 cups unsalted butter, cubed, and brought to room temperature
1 teaspoon vanilla extract
 |
| Yes, you really ought to cube the butter and have it ready ahead of time. This picture is probably going to send my mom into a fit... |
 |
| ...especially when she sees that this is what I actually used. Hi Mom! |
Dissolve the espresso powder into the hot water. Set aside to cool.
Combine sugar and the 6 tablespoons of water in a medium-sized saucepan. Cook, stirring with a wooden spoon, over low heat until the sugar has dissolved and the syrup is clear. Increase the heat to medium-high and allow syrup to come to a boil.

In the meantime, place yolks in the bowl of a stand mixer fitted with the whisk attachment and beat until thick and foamy.
Once the syrup has come to a boil, begin to monitor the temperature with a candy thermometer. Cook until the syrup reaches 238 degrees, then immediately remove from heat. With the mixer running, slowly drizzle the hot syrup down the side of the bowl into the yolks (pouring the hot syrup directly into the eggs may cause the eggs to scramble, and pouring the syrup onto the whisk could result in said syrup flying right into your face and sticking there).
Once all the syrup has been added, keep mixing until the bottom of the bowl feels cool to the touch and the pâte à bombe (also known as your yolk-and-syrup mixture) has cooled down to room temperature.
Begin to add the butter, one or two cubes at a time, and mix well after each addition (do not panic at any point in this process. You're likely to. I do, every time I make this kind of buttercream. It may look like it's curdling. It may look like you've somehow evaporated all the egg yolks and are just creaming straight butter to put on your cupcakes. Just keep adding and mixing. You'll be fine). Once all the butter has been added, add in your espresso mixture and vanilla and mix for another 5 minutes, or until the buttercream looks smooth and creamy.
Frost your cupcakes with a pastry bag fitted with the 1M tip (or just swoosh it on with a handy butter knife). This is not the time, though, to pile on the frosting. I hear you..."But I love frosting!" I'm sure you do. Think, though, for a moment, about the ingredients you just used, and have a light touch.

Okay, now you've got nekkid cupcakes. Let's fix that.
~Caramel Drizzle~

In the meantime, place yolks in the bowl of a stand mixer fitted with the whisk attachment and beat until thick and foamy.
Once the syrup has come to a boil, begin to monitor the temperature with a candy thermometer. Cook until the syrup reaches 238 degrees, then immediately remove from heat. With the mixer running, slowly drizzle the hot syrup down the side of the bowl into the yolks (pouring the hot syrup directly into the eggs may cause the eggs to scramble, and pouring the syrup onto the whisk could result in said syrup flying right into your face and sticking there).
 |
| The egg yolks with the syrup should look like this...no curdling! |
Begin to add the butter, one or two cubes at a time, and mix well after each addition (do not panic at any point in this process. You're likely to. I do, every time I make this kind of buttercream. It may look like it's curdling. It may look like you've somehow evaporated all the egg yolks and are just creaming straight butter to put on your cupcakes. Just keep adding and mixing. You'll be fine). Once all the butter has been added, add in your espresso mixture and vanilla and mix for another 5 minutes, or until the buttercream looks smooth and creamy.
 |
| Not a Glamour Shot by any means, but you get the idea. |

Okay, now you've got nekkid cupcakes. Let's fix that.
~Caramel Drizzle~
2 cups granulated sugar
12 tablespoons (1 1/2 cups) unsalted butter, cubed and at room temperature
1 cup heavy cream, room temperature
1 teaspoon kosher salt
Add the sugar in an even layer over the bottom of a medium (2 to 3 quart) saucepan. Heat the sugar over medium-high heat, whisking it as it begins to melt. You’ll see that the sugar will begin to form clumps, but that’s okay. Just keep whisking and as it continues to cook, they will melt back down.
Stop whisking once all of the sugar has melted, and swirl the pan occasionally while the sugar cooks.
Continue cooking until the sugar has reached a dark amber color. Just at the moment that the caramel is starting to smell burnt, add in all the butter at once (this is not the time to check your email. Park yourself in front of the stove and use your senses). The caramel will start to bubble up, as it should. Whisk in the butter until it is completely melted, and remove the pan from the heat.
Slowly pour the cream into the caramel. There will again be bubbling. Stand back a bit and don't panic. Whisk until all of the cream has been incorporated the sauce is smooth. Add in your salt and whisk to incorporate.
 |
| This? Does not look promising. |
 |
| 'Lil better.. |
 |
| One thing I forgot to mention... DO NOT IN THE NAME OF ALL THAT IS HOLY STICK YOUR FINGER IN THIS... at least, not if you value your skin. |
Let the sauce cool cool for 10 to 15 minutes, pour into a heatproof container, and let cool to room temperature. The caramel can be refrigerated for up to 1 month.
Drizzle some of the caramel sauce (I used a squeeze bottle but you could use a pastry bag or a zip-top plastic bag with the corner snipped off) onto each cupcake.


Keep the cupcakes in the refrigerator for storage, but please bring them to room temperature before serving (biting into cold French buttercream is a great deal like gnawing on a sweet stick of butter. Unless, of course, you like that sort of thing - then by all means, go ahead).
Makes 22-24 overwrought cupcakes.


